Let’s be honest—who doesn’t love that sunkissed glow without actually baking under the scorching sun? If you’re tired of streaky store-bought tans, pricey salon sessions, or just want something that screams “I’m fabulous and DIY-ing it,” you’ve landed in the right place. I’ve spent countless hours experimenting with DIY fake tan recipes (and yes, made a few orange disasters along the way), so I’ve got the lowdown on what actually works. Today, I’m spilling the tea on 8 DIY fake tan recipes that’ll give you that bronzed goddess vibe—all from the comfort of your kitchen.
Why DIY Fake Tan Works Better Than Store-Bought
Before we jump into the recipes, let’s talk about why DIY fake tans are actually worth your time.
Control over ingredients – No more worrying about chemical-heavy store products. You know exactly what’s going on your skin.
Customizable color – Want a light glow or deep bronze? DIY gives you full control.
Budget-friendly – Seriously, your wallet will thank you. Most recipes use stuff you probably already have at home.
Honestly, nothing beats the satisfaction of looking at your arm and thinking, “Yep, that’s my color, and I made it myself.”
Prep Your Skin Like a Pro
Before we get all kitchen-scientist on our skin, a quick prep is essential. Skipping this step? Trust me, it shows.
Exfoliate: Grab a gentle scrub or a DIY sugar scrub. Buff away dead skin so your tan goes on smooth.
Moisturize: Focus on dry areas like elbows, knees, and ankles. A little hydration prevents patchiness.
Shave if needed: Smooth skin = even color. Duh.
Pro tip: Do a patch test with any mixture you make. Your skin might react differently than mine (and I’ve been through some… um, interesting shades).
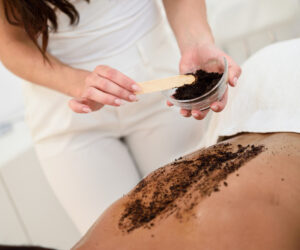
1. Coffee & Cocoa Glow
This is my personal favorite because, well, it smells like chocolate AND coffee. Who doesn’t want to smell like dessert?
Ingredients:
2 tbsp instant coffee
2 tbsp cocoa powder
1–2 tbsp coconut oil
Method:
Mix coffee, cocoa, and coconut oil until it forms a paste.
Apply evenly in circular motions.
Leave for 20–30 minutes, then rinse with lukewarm water.
Why it works: The caffeine and cocoa give a subtle brown tint that develops into a natural-looking bronze. FYI, this is more of a light glow than a full tan—perfect for beginners.
2. Black Tea Tan
If coffee’s not your thing, black tea has your back. It’s simple, natural, and gives surprisingly good results.
Ingredients:
4–5 black tea bags
1 cup boiling water
1 tsp olive oil (optional, for moisturizing)
Method:
Brew tea and let it cool.
Mix in olive oil.
Apply with a cotton ball or spray bottle.
Leave for 30–40 minutes, then rinse gently.
Pro tip: Repeat a few times for a darker shade. The longer you leave it, the deeper the color—just don’t scare your friends with an Oompa-Loompa hue.
3. Carrot Juice Tint
This one’s a game-changer if you want a subtle orange-y warmth. Carrot juice has beta-carotene, which is skin-friendly and develops into a healthy glow.
Ingredients:
1/2 cup carrot juice
1 tbsp coconut oil
1 tbsp plain yogurt
Method:
Mix all ingredients until smooth.
Apply evenly on clean skin.
Leave for 15–20 minutes before rinsing.
Note: Beta-carotene tints your skin slowly. This isn’t instant, but it’s like a long-term glow upgrade.
4. Beetroot Bronze
Want a pinkish, rosy glow? Beetroot’s your BFF. It’s vibrant, natural, and gives you that sun-kissed flush without looking fake.
Ingredients:
2–3 tbsp beetroot juice
1 tbsp coconut milk
Method:
Mix into a smooth paste.
Apply with a brush or sponge.
Leave for 10–15 minutes. Rinse gently.
Extra tip: Beetroot stains, so wear old clothes. Also, a thin layer gives better results than a thick one (lesson learned the messy way).
5. Cocoa & Aloe Hydration Tan
Let’s combine skincare and tanning in one step because honestly, who has time for multiple routines?
Ingredients:
2 tbsp cocoa powder
2 tbsp aloe vera gel
1 tsp olive oil
Method:
Blend ingredients to a smooth paste.
Apply in circular motions.
Leave for 20–30 minutes, then rinse.
Why it rocks: Cocoa tints, aloe hydrates, olive oil adds that silky finish. It’s basically self-care meets glam—IMO, a winner.
6. Cinnamon & Nutmeg Spice Glow
Here’s one for those who like a little spice in life. Cinnamon and nutmeg not only smell divine but also leave a warm, golden tint.
Ingredients:
2 tsp cinnamon
1 tsp nutmeg
2 tbsp coconut or almond oil
Method:
Mix everything into a paste.
Apply on dry skin evenly.
Leave for 15–20 minutes, rinse off gently.
Pro tip: Avoid sensitive areas (face, etc.) first. Cinnamon can irritate some skin types, so patch test!
7. Cocoa Coffee Mix for Deep Tan
If you want something stronger than the light coffee recipe, let’s kick it up a notch. This one gives darker, more noticeable results.
Ingredients:
2 tbsp cocoa powder
2 tbsp instant coffee
1 tbsp olive oil or coconut oil
Method:
Mix cocoa, coffee, and oil into a thick paste.
Apply evenly, focusing on areas you want darker.
Leave for 30–40 minutes. Rinse with lukewarm water.
Why it works: Combining coffee and cocoa creates a richer tint than either alone. It’s like the Batman and Robin of DIY tanning.
8. Walnut & Honey Bronze
Finally, a recipe that’s sweet, natural, and gives that rich golden-brown tone. Walnut powder is underrated in DIY tanning.
Ingredients:
2 tbsp walnut powder
1 tbsp honey
1 tbsp yogurt or coconut milk
Method:
Mix all ingredients until smooth.
Apply evenly and massage in gentle circles.
Leave for 20–25 minutes, then rinse.
Extra benefit: Honey moisturizes and walnut adds antioxidants. So basically, you’re tanning AND doing a mini facial. Fancy, right?
Tips for a Flawless DIY Fake Tan
Even the best recipe can fail if you skip a few tricks. Here’s what I’ve learned after some… let’s call them experimental disasters:
Exfoliate first – Seriously, your elbows, knees, and feet will thank you.
Moisturize dry spots – Prevents dark patches and uneven color.
Apply evenly – Use circular motions for smooth coverage.
Start thin – You can always layer for more color, but you can’t undo an accidental orange stripe.
Rinse gently – Use lukewarm water and avoid harsh scrubbing.
Pat, don’t rub – Especially with beetroot and carrot-based tans.
Maintaining Your DIY Glow
Once you’ve achieved that gorgeous bronze, keeping it is just as important.
Moisturize daily – Hydrated skin keeps color longer.
Avoid long hot showers – They strip your glow faster than you think.
Reapply weekly – DIY tans aren’t permanent, but a little maintenance goes a long way.
Exfoliate lightly – Helps even out fading color without going patchy.
Final Thoughts
So there you have it—8 DIY fake tan recipes that actually work and smell amazing too. From coffee and cocoa to beetroot and walnut, there’s something for everyone. IMO, DIY tans are not just about saving money; they’re about control, fun, and a little self-indulgence.
Ever thought your kitchen could double as a tanning salon? Well, now it can! Go ahead, experiment with these recipes, find your favorite, and say goodbye to uneven, chemical-laden store tans. And remember, a little humor and patience go a long way—because yes, sometimes you might end up a shade of pumpkin before you get it right.
Now go forth, glow, and flaunt that DIY bronze like the sun-kissed legend you are!